Crestline Experimental Dive Unit
Presents a
Heads Down Display
for the
FEOR Light
HDD PPO2 Sensing Module and Display for FEOR Light
. . .
.
Crestline Experimental Dive Unit
Presents a
Heads Down Display
for the
FEOR Light
HDD PPO2 Sensing Module and Display for FEOR Light
. . .
.
Mission:
For our next evolution in learning about circuits, the engineering division of the CEDU was tasked to develop a Heads Down Display (HDD) for the FEOR Light whose use is somewhat intuitively obvious to even the most casual observer.
. . . .
Introduction:
The more that I use these rebreathers, with or without the various circuitry that I have hacked together, the more cautious I become in their use. It seems that the more I learn about what I am making, the more I discover what can go wrong. I am constantly discovering new, and subtle ways that these tools can lie to me and cause me harm. You gotta keep an eye on them, but what a great source of entertainment this has all become.
Sometimes I think that I don't know Jack. I may not, but I have just
been introduced to Forrest. Forrest M. Mimms III
that is. His Radio Shack Books (1) Getting Started in Electronics, (2) Timer,
Op Amp & Optoelectronic Circuits & Projects, (3) Engineer's Mini-Notebook
Formulas, Tables and Basic Circuits, and (4) Engineer's Mini-Notebook Digital
Logic Circuits were used to develop my HDD. These are great books to start
with, I can honestly say that they are presented in a manner that even a dentist
can understand. Thank you Forrest.
This project was a blatant attempt to reduce the complexity of rebreather diving by taking the higher level thinking of alpha-numeric interpretation, out of the mental processing loop.

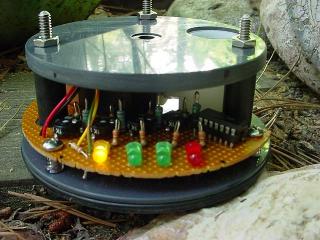
HDD Module in FEOR Light
(In this image the Yellow and the First Green LED's are illuminated.)
. . .
.
Background:
There sure seems to be inflation in the number of instruments being used with our diving gear. What with reading and keeping track of depth gauges, tank pressure gauge(s), bottom timers, decompression computer info, oxygen clocks, number of rounds remaining, etc., adding the additional burdensome task of reading a PPO2 display just might put the novice and/or seasoned rebreather diver over the edge of task loading sometimes. Confusion may be encountered as our displays come in many shapes, sizes, forms, and locations. And then there is the potentially confusing differences of instrumentation in analog vs. digital, and metric vs imperial format. (We will not even get into the language barriers encountered by manufacturers using using different numeric systems, eg: Arabic, Roman, Decimal, Hexadecimal, Base 8, (You remember Base8, it is similar to Base 10. ...... if you are missing two fingers), etc in their instruments.
A mo'simple display was sought that could be interpreted and used by a vast number of people. By people intimately familiar with, or maybe not that familiar with, this specific piece of gear. And yes, even by people who may be experiencing a slightly impaired condition, such as those with a BAC of 0.08, and still manage to be in control of "the wheel", or "the valve", as the case may be. This display is for you.
The simplicity of a familiar, universal, discrete color scheme and presentation, based upon that which is encountered everyday by motor vehicle drivers worldwide, was selected for this evaluation. Simply put, this evaluation is to test the feasibility of reducing the complexity of monitoring your life support tasks down to a level as familiar as reacting to traffic signals when driving a car... even if you are experiencing a little nitrogen narcosis at the time! And, if you can't drive a car, you shouldn't drive a rebreather. (The devil made me say that.)
Heck, this system may even be understood and used by the completely inept. (Did I say that?)
Yes, the FEOR Traffic Signal, or CEDU's first generation of Idiot Lights are being put to the test.
. . . .
The Lights
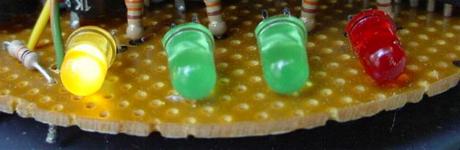
Four LED's of three different colors were used. A Yellow, two Green ones, and a Red. The above image shows the Yellow LED illuminated.
. . . .
Some Theory of Operation
The lights come on in sequence. The circuit is based on an OpAmp comparater circuit which, in this case compares the millivoltage output of an Oxygen Sensor to four different preset reference voltages. The reference voltages were chosen to correspond to some prearranged PPO2 values. Below a certain millivolt, no lights are illuminated. As the sensor millivolt output increases with an increasing PPO2 the first of the LED's (Yellow) turns on. As the millivoltage continues to increase the a Green LED additionally illuminates, and so on, until all four LEDs are illuminated. (This is called a Bar graph.)
Additional Information about the circuit, its design, a diagram, a list of components, a formula used, the breadboarded circuit, and some comments about it can be found at the indicated link.
Light Bar Code
Briefly, and without going into details about specific PPO2
settings for each LED, (if you do decide to build this, you will after all,
modify the circuit to make it fit your own personal needs), the more lights
lighted, the higher the PPO2
. . . .
Do Not Use
When No LED's are glowing either the HDD is not working, or the PPO2 of
the sensed gas is much below that what is considered safe to breathe.
Do not use without further inspection and evaluation of the unit.
. . . .
Caution
When only the Yellow LED is glowing, think CAUTION. A low PPO2 caution
if you will.
The PPO2 of the gas sensed may be marginally breathable at best. At worst it
may not support consciousness.
Add some oxygen to the system to increase the PPO2.
(Most automobile drivers, when they see a yellow light seem to step on the gas.
Though this is not what DMV teaches, this
observed behavior is being exploited by the CEDU. When you see Only the Yellow
LED "step on it, open the valve" and
add some oxygen.)
. .
. .
Go
When the first Green LED now also gets illuminated, the unit is (or
should be) Good to Go.
The gas should have a partial pressure oxygen content around that found
in air at sea level.
The PPO2 should be up to a more familiar and breathable range.
. . .
.
Go Go
When the second Green LED now illuminates, the PPO2 is higher yet and
still Good to Go, or good to breathe.
A little higher PPO2, thus more of a good thing if you will. (This is the area
that I would like the PPO2 to hang around for this experiment.)
. . .
.
Stop
When you see the Red LED also illuminate, I want you to think caution
again, and Stop what you are doing.
This is a high PPO2 Caution warning if you will.
The oxygen level is still in a safe and breathable range, with a PPO2 value
less than 1.0 but, it is getting up there and should get your attention.
It is not a desirable trend for your PPO2 to continue to increase, thus you
should Stop what you are doing and pay attention to the unit or other
environmental phenomena to determine why the PPO2 is increasing, decide what to
do about it, and make corrective actions.
Operational Use
During use I expect to see no less than two LED's illuminated before I start to breathe from the unit. I hope to keep the PPO2 such that one or both Green LED's are on. When I detect only one Green LED on, I plan to add oxygen to the rig until the second Green LED illuminates. Thus the idea of use is to manually add a little oxygen when I see the Yellow and one Green LED illuminated. When the second Green LED illuminates, oxygen addition should be stopped.
I may see the Red LED occasionally come on because if you may remember the oxygen addition plumbing of the FEOR Light is directed toward the sensor, and/or I may have added to much oxygen. The PPO2 value corresponding with the lighting of the Red LED is below 1.0 in this experimental circuit. This value was selected for circuit evaluation reasons. ( I really didn't want the red light to be my "Convulsion Imminent" warning.) On the other extreme, the sight of no LED's illuminated either means, (a) the gas is not breathable, (b) my electronics are dead, or (c) I am dead. Either I, or God will have to sort this situation out when presented.
The specific PPO2's that I selected are really not that important for these series of tests, suffice it to say that if no LED's are illuminated, the breathing mixture is not highly conducive to sustaining consciousness. If only the Yellow LED is on, the breathing mixture is marginally breathable at best, as hypoxic conditions are being encountered, thus oxygen should be added to the rig. When the first Green comes on in addition to the Yellow, the PPO2 is in a breathable range. When the second Green LED is also illuminated, the PPO2 has reached some higher and still breathable range. When the Red LED now also illuminates the PPO2 has reached some upper value I selected, yet still breathable. (In this particular circuit it will be close to but not quite 1.0. But it is getting up into to an area that I should be getting concerned with, and do something about.)
And finally remember that the FEOR is an Oxygen Rebreather, there is no means to inject a diluent gas. (Any gas which may be acting as a diluent has been trapped in the unit-diver system prior to descent.) The unit is being dived only as an oxygen rebreather, with strict depth limitations respected. The HDD display is added to the unit for evaluation purposes only.
. . . .
Other Information
Layout of the HDD Module showing Sensor & Circuit Board

The HDD has no On/Off switch. When the battery is connected just before the
dive, the Module is turned on, and once placed within the FEOR the diver has no
way to affect the Sensor/Display Module. (Other than flooding it. I know,
I've been there, done that, lights still shine... well most of them anyway.)
Plus
"CEDU Glass"
First Pictures of Potted Electronics
Shown
[More Information
& Pictures of the HDD, Page 3 ]
. . . .
The Dive
The dive was conducted at late afternoon on Sunday 5/26/2002 at Malaga
Cove, California. Conditions could not have been better and it was a beautiful
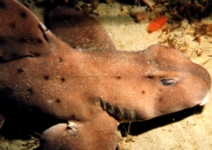
dive. The fauna and flora were exceptionally healthy. Numerous Horn Sharks
and their egg cases were seen. A five foot Angel Shark swam by leisurely, and a
legal size Halibut was seen hiding in the sand. Masking Crabs and juvenile
Lobsters also were abundant. The growth of kelp was so heavy in places as
actually making it difficult to swim through. Malaga Cove will always be one of
my most favorite dive spots.
The dive almost was a solo dive, as my dive buddy Erick was not available. At the last minute an OC diver asked what I was doing, and if he could join me as this was his first dive at Malaga. It is always smart to have a dive buddy and I thank Dean for joining me. As it turned out, we were a help to each other in the dive, thus demonstrating the benefit of diving with someone. (Dean was overweighed, the couple of extra pounds of lead that he handed off to me was welcome as I was not carrying my camera equipment and benefited by those pounds. In addition, a strap on my gear which came undone was more easy for him to fasten than me. Thanks Dean.)

The sun setting on the FEOR.
As the sun set, another wonderful dive ended. The HDD seemed to work as advertised. More LED's illuminated as depth increased, and as oxygen was added to the system. And it was much easier to view the colorful LED's that it was to read the digital display.
Disclaimer:
As a Disclaimer I must say that just because I did something and shared
it with you on these pages, don't think that you can
get away with doing it yourself. You can't do it unless you already have done
it.
All of my webpages are primarially provided for their entertainment value, and mostly for my entertainment value at that! But I like sharing, so enjoy. Those of you who return in kind with you own webpages, Thank You. We all learn something from each other.
Enjoy,
Dr. Bob
Director, CEDU

Special Thanks to Jane
(My dive buddy, personal photographer and wife.)
Additional pages as mentioned above:
[Page 2,
Electronic Circuit Info ]
[Page 3, HDD
Pictures & More Info ]
[Page 4, Marine
Life Pictures]
More information about Rebreathers/SUBLIME/and the CEDU
can be found starting at
Dr. Bob's The Home Page
"To Swim Is Human, To Dive Is SUBLIME"
And Remember CEDU's Mission Statement:
"To Design, Assemble and Use Homemade Dive Gear While Maximally Stroking Our
Own Ego's and Maintaining the Merest Semblance of Sobriety for the Benefit of
Mankind"