This Page is for Ron Edmundson's eyes only.
Any one else caught viewing this page without permission or proper supervision
may be doomed with the curse of actually Diving a piece of Home Made Dive
Gear. Let the builder beware.
Ron, you remember the SA-2 Genesis. And you know, I use it as a "working platform" for the evolution to "a higher level" (so to speak) in my tinkering. The next MOD I have been working on is the underwater PO2 Sensor.
We can call this mod the SA-2/S or the Genesis with Sensor. (Though, You will come to know it as the SA-3, code name "Bones".)
The sensor used is the Teledyne R-17 Med. (I am using the one from the Vandagraph LTD. Oxygen Analyzer.)
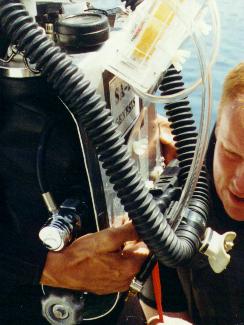
You can see that I placed it in the connection of the inhalation hose and the bulkhead of the 'breather. (I am sensing the gas that I inhale.)
The sensor uses an 1/8 inch plug. The sensor is connected to the Display with a pair of wires in clear tubing which was made water tight by potting each end within the brass fittings with silicone. The acrylic housing for the display was hand made by you know who. (Just like the instamatic camera housing from 1973. Technology standing the test of time.)
The output of the sensor is split through a load resistor (10K for this sensor) and the output is read in the backlight display. You must tune (calibrate) the "pot" to read ~20/21 in air before the dive.
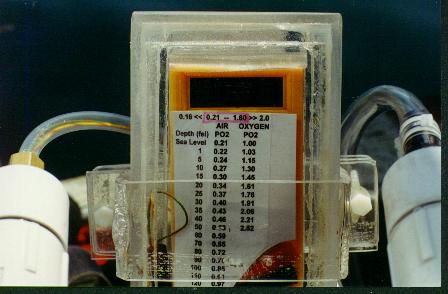
That first picture I sent you was a close up of the Display:
( Heads-Up-Display, Tables cut for Air and O2)
As you see it is placed in an acrylic box which I made to keep the nasty salt water out. The display is a modified volt/ohm meter mainly because it had a backlit screen. (The little wrist mount LCD that I have been breadboarding has no backlight.) Within the acrylic container is some other electronic parts used in calibrating and connecting the unit.
The display is mounted to an arm which keeps it in front of you. There is a means of positioning the display higher or lower within the line of sight by the user.
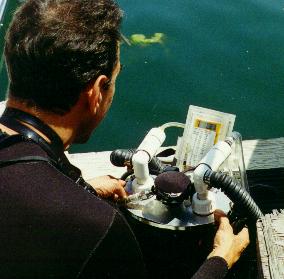
( Showing HUD position.)
The "door" of the box in on the bottom, where a silicone seal keeps it watertight. The bottom also contains the fitting for the wires pass-through. (The wires are potted with silicone on both ends.)
The O2 sensor fits within a PVC joint junction of the Inhalation side <Left> hose attachment to the bulkhead.
The O2 sensor is contained in its water tight space with an O ring.
See the three pieces of the O2 sensing system. (Sensor/Cable/Display-Case).
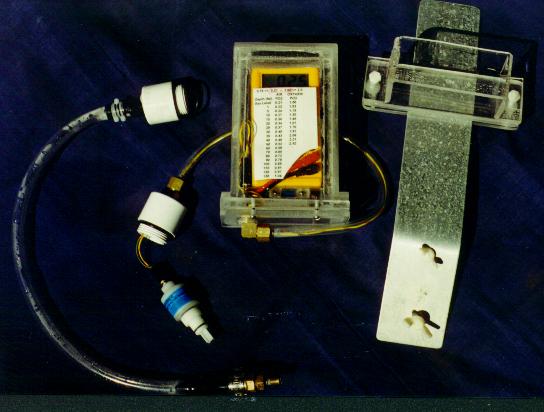
(L to R: Diluent addition assembly. Electronics assembly. Mounting assembly.)
Well now what do we have but the SA-2 Genesis with an
O2 sensor....
....And you know that it was but a small step to place a Diluent addition
system to the Exhalation side of the 'breather.
So while I was at it, going to town with PVC joints, I added a diluent addition system. (You know what the manual addition valve is. So for fear of minors reading this page I will omit its colloquial name.)
Thus when all is said and done, what we have is a multi-functioning rig:
A) A Closed Circuit Mixed Gas, Manual Rebreather with
PO2 Sensor and Display
This configuration uses the onboard O2 supply, and an offboard Diluent,
eg Air from a back mounted scuba system. (A small 6cf bottle also works.)
((In this mode a full back mounted scuba set is recommended, particularly
to be used as an emergency bail out system, as we still must consider this
an experimental system. Or at the very least an artform in progress. ))
B) A Closed Circuit Oxygen Rebreather, with PO2 Sensor
and Display
This configuration is autonomous with on board gas. This is the Genesis
with the sensor and display. (Remove the diluent addition plumbing and
cover with a plug.)
C) A Closed Circuit Oxygen Rebreather.
The Genesis. (Just remove the sensor and assorted hardware, and place a
plug over the sensors hole.)
Another project completed. Both Pool testing and Open water testing was
conducted. All systems functioned, life support system brought back all
divers in good health. (How is that for PC.) I did note that in the open
water, with full ocean gear on that for some reason I tightened the rebreather
harness to tight. (Crotch strap) This pulled the unit tight and close to
my chest. This compression of the breathing bag restricted its full volume.
I noted this reduced volume in the ocean which was not present in the pool.
In the pool the unit was more loosly attached. (Learning note is not to
cintch the straps to tightly.)
Some pictures follow:
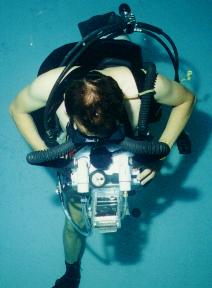
(In pool overhead shot.)
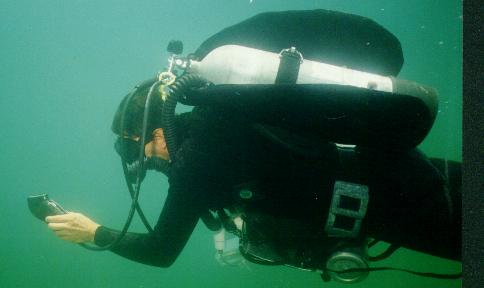
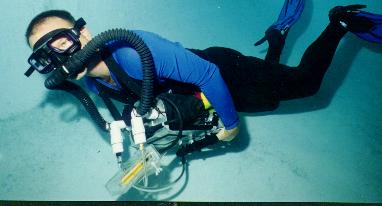
( Open Water Test)
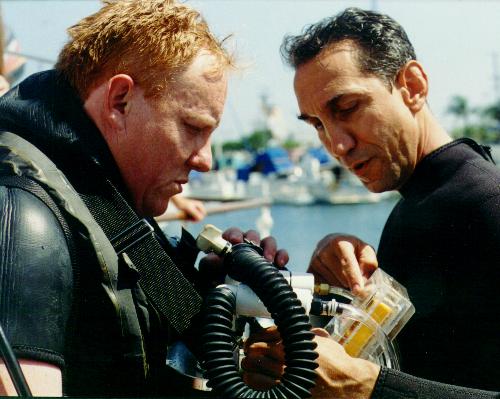
(Pre-Dive Check of PO2 Sensor)
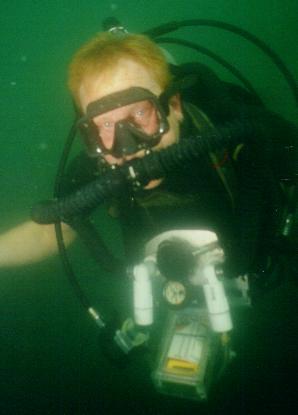
(Test Diver Erick Stressing the Unit.)
(Test Diver Wayne in Pool. Note hard to see yellow 6cf diluent bottle tucked under counterlung and over O2 cylinder. )
Ron, Hope you enjoyed this page. See you next weekend. Be prepared for a Mixed Bag.
Smile, Bob.
*If you cannot Make a Rebreather, You Shouldn't be Diving a Rebreather.*
(P.S. Please review the Checklist, you will be tested before the dive.)
BONES Checklist:
Manually Operated Closed Circuit Mixed Gas Rebreather
Pre-Dive
1. Refill CO2 Scrubber
2. Calibrate Sensor
3. Assemble Rig
4. Connect Diluent Gas
5. Turn on all gas supply, Note cylinder pressures
. . . . O2_______psi, . . . Diluent (Air)______psi
6. Leak Check (Fill rig with Diluent, Look/Listen/Feel/Submerge, check
Display). If no leaking detected, AND Sensor reads +/- .01 of the expected
value, then "Bones" is ready to dive................
.......................No Guts, No Glory. Go For It......................
(And Remember, Your Next Breath May Be Your LAST ! )
Diving Operation:
During Descent,
During descent add Diluent Gas to the Counterlung by using the Manual
Addition (RD) Valve at the junction of the diluent connection (low pressure
inflator) hose. [You will be adding diluent gas to make up for the decreasing
circulating gas volume caused by the increasing ambient pressure with increasing
depth.]
Monitor your Heads Up PO2 Display, the readings should be increasing as
you descend. Keep the PO2 below 1.20.
At MOD:
At the Maximum Operation Depth, or the deepest depth that you will
be diving note your PO2 reading. [Note: If you stay at a constant depth
the only gas that you will be consuming is Oxygen, therefore as you metabolize
the O2...make CO2...and scrub out the CO2 your circulating gas volume will
slowly decrease with a corresponding decrease in the PO2 reading on your
display. Eventually the circulating gas volume will decrease to the point
where taking a "full" breath is restricted, you can then add
Oxygen to the system. In practice you will be adding a little O2 every
minute or so to keep the loop volume comfortable, and keeping the PO2 within
safe limits.]
A safe situation will be encountered if your PO2 is maintained between
a reading of .50 and 1.20.
If the reading gets below .50 add a little oxygen to the loop by depressing
the Oxygen Addition Valve located between the Inhalation and Exhalation
hoses on the top bulkhead of the unit. (It is the big black neoprene covered
button that looks like a second stage regulator.)
If the reading goes above 1.20 ,dilute the gas supply by adding Diluent
Gas (Air in this case) by activating the Manual Addition (RD) Valve.
Note: It is possible to add more gas than the counterlung can handle, at
which time excess gas can be vented by exhaling out of the operators nose,
or blown out from around the bite block where the lips make a seal to the
bite block.
Warning: forced flatulence is not a recommended way for the removal of
excess gas in the loop (AND Smoking is not permitted while using this Rebreather).
During Ascent
Prior to ascending add oxygen to the loop to bring the PO2 up to
its upper range about 1.20.
[While you are ascending the ambient pressure will be decreasing and the
loop gas will be expanding. You will be venting off excess gas, and the
partial pressure of O2 will be decreasing. Try not to let the PO2 drop
below .50 ]
Ascend in 10 foot increments and stop, check the PO2 reading and add oxygen
as necessary to keep the PO2 near the upper limits.
Post Dive
1. Place bite block in Surface Mode and Exit water.
2. Disconnect Diluent source, Remove unit, and Turn all cylinders to OFF
position.
3. Thank your God for Defying Death.
4. Tell entertaining stories on the various problems you overcame in using
this complicated unit. (Creativity counts.)
5. Tell everyone how great closed circuit diving is (Round up the usual
accolades: ...quiet...close fish encounters...etc.)
6. Convince another (gullible) soul to try the unit on a dive.
7. And most important, Wear With Pride the fact that you are now a member
of the club of Closed Circuit Mixed Gas Rebreather Divers.
P.S. Don' forget to clean out the unit. We don't want to pass on our germs to our buddies. Of course, on the other hand, maybe we do: what better way to spread the Rebreather Disease.
...And If You Survive, and
........You Have Been Bad To Your Bones.
............You Have Earned Your Reward. Carry your card proudly.